Category Archives: Code

Build a custom web application generator with yeoman

Background

At the University of Central Missouri our web application team currently uses a home-grown framework built to help us speed up our development and maintenance time by providing the common, standardized pieces we use in every one of our applications.

The original version consisted of a git repository with a readme.txt file with instructions on how to search and replace certain placeholder text for titles and variable, file, and class names.

When I discovered Grunt I created a script to ask for certain questions in lieu of the search and replace method mentioned above. This worked well and sped up our application start up time tremendously; however, there were certain conditional pieces of code in our applications that should be included or not based on answers in the Grunt script. For example, we use two different Database Management Systems (DBMS) and have certain code needed depending on which is chosen for that project. I was unable to find a good solution for this using Grunt.

Our Basic Yeoman Setup

After some time passed, I came across Yeoman and determined that it would handle the conditional case mentioned above and would allow for more flexibility in the future. I have outlined the main pieces of how I set it up below.

Dependencies / package.json

Besides the yeoman-generator dependency, our application generator also leverages random.org’s API to generate unique strings using this npm library. I have included our package.json file in its entirety below.

{
  "name": "generator-custom-webapp",
  "version": "1.3.1",
  "description": "A custom webapp generator.",
  "files": [
    "app"
  ],
  "keywords": [
    "yeoman-generator"
  ],
  "dependencies": {
    "yeoman-generator": "^0.20.3",
    "random-org": "^0.1.3"
  }
}

 app/index.js

We start by requiring the random-org generator and then instantiating it using our API key we received from Random.org.

'use strict';
var RandomOrg = require('random-org');
var generators = require( 'yeoman-generator' );
module.exports = generators.Base.extend({
    prompting: function () {
        var done = this.async();
        this.random = new RandomOrg( { apiKey: 'your_api_key_here' } );

Prompts

Next we set the prompts we want for our application details. For example, we ask for an application abbreviation which is used to build portions of class names and variables throughout the application. Additionally, we have a checkbox prompt for DBMS type which is used in the templates to conditionally pull the correct database files.

Example prompts:

        {
            type: 'input',
            name: 'application_abbr',
            message: 'Your application abbreviation',
            default: this.appname
        },
        {
            type: 'checkbox',
            name: 'db_type',
            message: 'Database Type',
            choices: [{
                name: 'mysql',
                value: 'includeMysql',
                checked: true
            },{
                name: 'postgre',
                value: 'includePostgre',
                checked: false
            }]
        }

Example template logic:

<?php
<% if (includePostgre) { -%>
 // instantiate Postgre db class
 $dbClass = new <%= application_abbr %>PostgreClass();
<% } %>
<% if (includeMysql) { -%>
  // instantiate mysql db class
  $dbClass = new <%= application_abbr %>MysqlClass();
<% } %>

Notice that the checkbox value is used in the template if statements and the application abbreviate value is used in the  class instantiation call.

While still inside of the prompting function, but after the prompts, we access the answers given and set them into a variable (this.all_app_vars) that will be used in the writing function.

            var db_type = answers.db_type;
            function hasDbtype(dtype) {
                return dbtype && dbtype.indexOf(dtype) !== -1;
            }

            if( hasDbtype( 'includeMysql' ) ) {
                db_name = 'mysql';
            }

            if( hasDbtype( 'includePostgre' ) ) {
                db_name = 'postgre';
            }

            this.all_app_vars = {
                application_abbr: answers.application_abbr,
                includeMysql: hasDbtype( 'includeMysql' ),
                includePostgre: hasDbtype( 'includePostgre' ),
            };

Generating the files

In the writing function we call the Random.org API to get the random strings, display information from Random.org so we don’t violate the API’s terms, and call the function that copies the templates to our destination (the template variables are parsed during the copy function).

writing: {
        app: function () {
            this.random.generateStrings({n: 2, length: 15, characters: "ABCDEFGHIJKLMNOPQRSTUVWXYZ0123456789"}).then(function(result) {
                console.log("Bits used: " + result.bitsUsed);
                console.log("Bits left: " + result.bitsLeft);
                console.log("Requests left for today: " + result.requestsLeft);
                console.log("DO NOT Run Another request for the next: " + result.advisoryDelay + " milliseconds");
                for(var i=0; i<result.random.data.length; i++) {
                    switch (i) {
                        case 0:
                            this.all_app_vars.secret_key = result.random.data[i];
                            break;
                        case 1:
                            this.all_app_vars.special_salt = result.random.data[i];
                            break;
                        default:
                            break;
                    }
                }
                this.fs.copyTpl(this.templatePath(), this.destinationPath(), this.all_app_vars);
            }.bind(this));
        }
    },

Example index.js file

'use strict';
var RandomOrg = require('random-org');
var generators = require( 'yeoman-generator' );
module.exports = generators.Base.extend({
    prompting: function () {
        var done = this.async();
        this.random = new RandomOrg( { apiKey: 'your_api_key_here' } );
        var prompts = [
        {
            type: 'input',
            name: 'application_abbr',
            message: 'Your application abbreviation',
            default: this._helpers.abbrFromString(this.appname)
        },
        {
            type: 'checkbox',
            name: 'db_type',
            message: 'Database Type',
            choices: [{
                name: 'mysql',
                value: 'includeMysql',
                checked: true
            },{
                name: 'postgre',
                value: 'includePostgre',
                checked: false
            }]
        }
        ];
        this.prompt(prompts, function ( answers ) {
            var db_type = answers.db_type;
            function hasDbtype(dtype) {
                return dbtype && dbtype.indexOf(dtype) !== -1;
            }
 
            if( hasDbtype( 'includeMysql' ) ) {
                db_name = 'mysql';
            }
 
            if( hasDbtype( 'includePostgre' ) ) {
                db_name = 'postgre';
            }
 
            this.all_app_vars = {
                application_abbr: answers.application_abbr,
                includeMysql: hasDbtype( 'includeMysql' ),
                includePostgre: hasDbtype( 'includePostgre' ),
            };
            done();
        }.bind(this));
    },
 
    writing: {
        app: function () {
            this.random.generateStrings({n: 2, length: 28, characters: "ABCDEFGHIJKLMNOPQRSTUVWXYZ0123456789"}).then(function(result) {
                console.log("Bits used: " + result.bitsUsed);
                console.log("Bits left: " + result.bitsLeft);
                console.log("Requests left for today: " + result.requestsLeft);
                console.log("DO NOT Run Another request for the next: " + result.advisoryDelay + " milliseconds");
                for(var i=0; i<result.random.data.length; i++) {
                    switch (i) {
                        case 0:
                            this.all_app_vars.secret_key = result.random.data[i];
                            break;
                        case 1:
                            this.all_app_vars.special_salt = result.random.data[i];
                            break;
                        default:
                            break;
                    }
                }
                this.fs.copyTpl(this.templatePath(), this.destinationPath(), this.all_app_vars);
            }.bind(this));
        }
    },
 
    _helpers: {
        upperWords: function (sampleString) {
            return sampleString.replace(/\w\S*/g, function(txt) {return txt.charAt(0).toUpperCase() + txt.substr(1).toLowerCase();});
        },
 
        abbrFromString: function (sampleString) {
            var abbr = sampleString.substring(0, 2);
            return this.makeAbbrSafe(abbr);
        },
 
        makeAbbrSafe: function (abbrString) {
            var abbr = abbrString.replace(/[\W_]+/g, '_').replace(/^(\d)/, '_$1');
            return abbr;
        },
 
        createClassAbbr: function (abbrString) {
            var classAbbr = abbrString.charAt(0).toUpperCase() + abbrString.slice(1);
            return classAbbr;
        },
 
        getCurrentDate: function () {
            var date = new Date();
            return date.toString();
        }
    }
});

Hopefully that will give you an idea of how to set up your own custom generator, if you have any questions please leave a reply in the comments and I’ll do my best to get them answered.
This JVM setting fixed a very hard to find slowness issue in ColdFusion 11 (hint: it was random seed generator)

After launching our new web servers in July, 2015 with ColdFusion 11 there were complaints that pages and applications were taking “forever” to load. During our troubleshooting, we tried to eliminate as many variables as we could to narrow down the problem, and yet, no matter what we tried, sometimes the application would be fast (~2 seconds) and sometimes very slow (~20 seconds) for the same exact action. Nothing we tried, including doubling the amount of RAM and the number of CPUs had any effect. The only thing we knew for sure was that when the slowness manifested itself, the CPU would spike to 100% and sustain that level for some time. Once the CPU went back to normal levels the application would run at a normal speed again.

Through some lucky searching I found this blog post that suggested it was the seed generator. This issue is limited to Linux servers. We changed the JVM settings via the ColdFusion administrator to use the non-blocking seed generator instead and have not had the problem since. I wanted to share this in the hopes that others who have this problem will find the solution faster than we did.

Creating a custom post type for sharing videos in WordPress

The idea

In a recent project that I worked on, my client wanted to be able to post videos on his website as a completely separate type of content (Video Sermons) with it’s own archive page. Further requirements included ability to post upload videos and link to them, as well as post videos from outside sources such as Vimeo, YouTube, etc.

There are several methods to accomplishing the above requirements. I chose to utilize the Custom Post Type method. If you aren’t familiar at all with Custom Post Types I would suggest reading the WordPress codex page on them.

Registering the Video Post Type

The first task is to register the new post type using the register_post_type function. Here is the function I created for this purpose, I have added comments in the code to help understand what is happening.

function hlc_videos_register() { 
    $args = array( 'label' => __('Videos','globe'), //plural label
        'singular_label' => __('Video','globe'),
        'public' => true, 'show_ui' => true,
        'capability_type' => 'post',
        'hierarchical' => false,
        'rewrite' => true,
        'supports' => array('title', 'editor'), //we want the editor field so that regular content can be posted 
        'taxonomies' => array('category','post_tag') //we are using regular post categories instead of creating our own for this type. Also allowing tags 
    );
    register_post_type('videos', $args); //the actual function call 
} 
add_action('init', 'hlc_videos_register'); //add our function to the WP init action so that it is registered at the right time

function hlc_videos_register()
{
	$args = array(
		'label' =&gt; __('Videos','globe'), //plural label 
		'singular_label' =&gt; __('Video','globe'),
		'public' =&gt; true,
		'show_ui' =&gt; true,
		'capability_type' =&gt; 'post',
		'hierarchical' =&gt; false,
		'rewrite' =&gt; true,
		'supports' =&gt; array('title', 'editor'), //we want the editor field so that regular content can be posted
		'taxonomies' =&gt; array('category','post_tag') //we are using regular post categories instead of creating our own for this type.  Also allowing tags
	);
	
	register_post_type('videos', $args); //the actual function call
}
add_action('init', 'hlc_videos_register');  //add our function to the WP init action so that it is registered at the right time

Adding the Video Upload meta box *

Next I needed to create the meta box that would hold the video information. I wanted to provide one field where the video information was placed, both for embed code (YouTube, etc.) and for local videos (uploaded to the site). I also wanted to use the built in media upload functionality of WordPress as much as possible in order to keep the interface consistent for the client. Since I borrowed heavily from this post for the next few items it seems silly to duplicate that information. I would encourage you to read Michael’s post to understand what is going on. I have posted my code and notes on things that I changed from Michael’s post. The main difference is that his post has to do with image upload and mine has to do with video upload.

$meta_box = array(
	'id' =&gt; 'hlc-meta-box',
	'title' =&gt; 'Video',
	'page' =&gt; 'videos',
	'context' =&gt; 'normal',
	'priority' =&gt; 'high',
	'fields' =&gt; array(
		array(
			'name' =&gt; 'Add Video',
			'desc' =&gt; 'Select a Video',
			'id' =&gt; 'upload_video',
			'type' =&gt; 'textarea',
			'std' =&gt; ''
		),
	array(
			'name' =&gt; '',
			'desc' =&gt; '',
			'id' =&gt; 'upload_video_button',
			'type' =&gt; 'button',
			'std' =&gt; 'Browse'
		),
	)
);
 
add_action('admin_menu', 'hlc_add_box');
 
// Add meta box
function hlc_add_box() {
	global $meta_box;
 
	add_meta_box($meta_box['id'], $meta_box['title'], 'hlc_show_box', $meta_box['page'], $meta_box['context'], $meta_box['priority']);
}
 
// Callback function to show fields in meta box
function hlc_show_box() {
	global $meta_box, $post;
 
	// Use nonce for verification
	echo '<input type="hidden" name="hlc_meta_box_nonce" value="', wp_create_nonce(basename(__FILE__)), '" />';
 
	echo '<table class="form-table">';
 
	foreach ($meta_box['fields'] as $field) {
		// get current post meta data
		$meta = get_post_meta($post->ID, $field['id'], true);
 
		echo '<tr>',
				'<th style="width:20%"><label for="', $field['id'], '">', $field['name'], '</label></th>',
				'<td>';
		switch ($field['type']) {


//If Text		
			case 'text':
				echo '<input type="text" name="', $field['id'], '" id="', $field['id'], '" value="', $meta ? $meta : $field['std'], '" size="30" style="width:97%" />',
					'<br />', $field['desc'];
				break;
 
 
//If Text Area			
			case 'textarea':
				echo '<textarea name="', $field['id'], '" id="', $field['id'], '" cols="60" rows="4" style="width:97%">', $meta ? $meta : $field['std'], '</textarea>',
					'<br />', $field['desc'];
				break;
 
 
//If Button	
 
				case 'button':
				echo '<input type="button" name="', $field['id'], '" id="', $field['id'], '"value="', $meta ? $meta : $field['std'], '" />';
				break;
		}
		echo 	'<td>',
			'</tr>';
	}
 
	echo '</table>';
}

Saving the data *

add_action('save_post', 'hlc_save_data');
 
// Save data from meta box
function hlc_save_data($post_id) {
	global $meta_box;
 
	// verify nonce
	if (!wp_verify_nonce($_POST['hlc_meta_box_nonce'], basename(__FILE__))) {
		return $post_id;
	}
 
	// check autosave
	if (defined('DOING_AUTOSAVE') &amp;&amp; DOING_AUTOSAVE) {
		return $post_id;
	}
 
	// check permissions
	if ('page' == $_POST['post_type']) {
		if (!current_user_can('edit_page', $post_id)) {
			return $post_id;
		}
	} elseif (!current_user_can('edit_post', $post_id)) {
		return $post_id;
	}
 
	foreach ($meta_box['fields'] as $field) {
		$old = get_post_meta($post_id, $field['id'], true);
		$new = $_POST[$field['id']];
 
		if ($new &amp;&amp; $new != $old) {
			update_post_meta($post_id, $field['id'], $new);
		} elseif ('' == $new &amp;&amp; $old) {
			delete_post_meta($post_id, $field['id'], $old);
		}
	}
}

Note: All of the above code is in a file called video.php and located in the theme’s lib folder.

Adding the JavaScript *

First we need to create some javascript to handle tying in our field with the media uploader. This is placed in a file named video-upload.js in the theme’s js folder.

jQuery(document).ready(function() {
	
	jQuery('#upload_video_button').click(function() {	
		tb_show('', 'media-upload.php?type=video&amp;TB_iframe=true');  //when our browse button is clicked popup the media page with type set to video instead of image
		return false;
	});

	window.send_to_editor = function(html) {
		var vidurl = jQuery(html).attr('href'); //get the video's url so we can place it in our textarea
		jQuery('#upload_video').val(vidurl); //place it in the textarea
		tb_remove(); //close the media window	
	}
});

Then we need to make sure we include the media upload js and styles

function my_admin_scripts() {
    wp_enqueue_script('media-upload');
    wp_enqueue_script('thickbox');
    wp_register_script('video-upload', get_bloginfo('stylesheet_directory') . '/js/video-upload.js', array('jquery','media-upload','thickbox'));
    wp_enqueue_script('video-upload');
}
function my_admin_styles() {
    wp_enqueue_style('thickbox');
}
add_action('admin_print_scripts', 'my_admin_scripts');
add_action('admin_print_styles', 'my_admin_styles');

* Thanks to this post by Michael for giving me a great base from which to build.

Creating the Video Sermon archive page

To create the Video Sermon archive page, I copied the theme’s page.php code and modified the query_posts function to pull in the video post type exclusively. Here is the top of the page with all of the parts that I modified (see the comments in the code for more details)

/**
* Template Name: Videos Page //added template name so I can tie a page to it.
**/

		$paged = get_query_var('paged') ? get_query_var('paged') : 1; //make sure we get the paged variable so pagination works correctly
		$a = array(
			'post_type' =&gt; 'videos', //only get the video post type
			'posts_per_page' =&gt; 10,  //limit the results to 10
			'paged' =&gt; $paged //pass in the paged variable
		);
		query_posts($a); //modify the query

Everything else on the page (including the loop) remained identical to the page.php file. Next I created a new page in the WordPress Admin and selected this template.

Creating the single video page

To create the single video page I copied the theme’s single.php file and made these modifications:

  • For local (uploaded) videos I needed a video player. I chose to use Flowplayer. I included an add_action call at the very top of the page for the video player so that it only is called on that page. add_action('wp_enqueue_scripts', 'hlc_flowplayer_setup');
  • Inside the loop, I needed to get the code from the video meta box and determine whether it was a local video or not and display it appropriately based on that.
$video = get_post_meta($post->ID,'upload_video',true);[/php] //get the video code (either a url for local or iframe for embed) 
//need to see if it is local or other (youtube)
$test = str_replace('iframe','[YT]',$video); //replace iframe with [YT] so we can count whether it exists or not
//now split on [YT]
$test = explode('[YT]', $test); 

if(count($test) < 2): //if [YT] doesn't exist the $test var will have only 1 item so we know it is a local video
<a href="[php] echo $video;[/php]" id="player"></a> //echo the url in this link for flowplayer to use
                       //now we add the flowplayer js to get it working
<script language="JavaScript">
			flowplayer("player","[php] bloginfo('url');[/php]/wp-content/themes/glass-globe-11/third-party/flowplayer-3.2.6/flowplayer-3.2.7.swf", {
				clip: {
					autoPlay: false,
					autoBuffering: true
				}
			});
			</script>
else: //otherwise if $test's count is 2 or more we have an embed video and all we need to do is print the embed code
print $video;[/php]
endif; //count($test)

Adding Flowplayer to the theme

In order to add Flowplayer for use in the theme, I placed the downloaded Flowplayer files in a new folder (called third-party to keep it separate from other theme files) inside the theme. You can see the reference to the swf file on line 13 of the code above.

Bringing it all together in the functions.php file

First I pull in the video.php file that creates the video post type:

//include videos post type
require_once('lib/videos.php');

Then we create the function that pulls in the flowplayer javascript. (the one we called from the single video page.

//include flowplayer on video posttype pages
function hlc_flowplayer_setup() {
	wp_register_script('flowplayer',get_bloginfo('stylesheet_directory').'/third-party/flowplayer-3.2.6/flowplayer-3.2.6.min.js');
	wp_enqueue_script('flowplayer');
}

Using Premium WordPress themes for client projects

Premium WordPress themes have evolved to the point where they are viable options for projects. I recently had a client approach me with the need for a revamp of their website, but they had limited resources. I suggested that they use a premium theme from Themeforest to keep their costs down while still having a site that looks professional.

After looking though several themes we decided on the Karma theme by TrueThemes. For less than $40 dollars they were able to change the site from an outdated design; static, and hard to update; to a professional looking, current design, with the easy to use WordPress backend. My client was then able to focus their budget toward the other important aspects of the site’s revamp: better content organization, video presentation, online virtual seminars, etc.

Disclosure: Some links in this post are affiliate links.

Showing the current weather on your website using MagpieRSS

The idea

I recently completed a quick project where the client wanted to have the local weather conditions displayed on his website through an RSS feed. The first hurdle I came to was finding a website that provided the feed and allowed for its use on other sites. I originally tried weather.com, but their terms of service didn’t allow commercial use. After searching for a while I came across weather.gov which provides XML and RSS feeds of the current weather conditions and allows you to display them on your own website without restrictions. The only downside is that you probably won’t be able to show weather for your exact location (only from the nearest observation center). You can view locations by state at this page.

Installing MagpieRSS

It’s easy to get started with MagpieRSS. Download it from SourceForge.net and extract it. Next, copy the extlib folder and the files: rss_cache.inc, rss_fetch.inc, rss_parse.inc, and rss_utils.inc into your website’s includes directory, preferably outside the web root. Next we need to set up the PHP that uses MagpieRSS to parse the RSS feed.

//include the rss_fetch file
require('rss_fetch.inc');

//set up a variable that we will use in displaying the feed's information
$rss = fetch_rss("http://www.weather.gov/xml/current_obs/KEOK.rss");

The $rss variable is an array of values from the feed including the title, link back to weather.gov for more details, and description. In most feeds we would have multiple items in the feed that we would want to loop through and display. This feed; however, only returns one item – and that is all we want to display. So when we call the item we insert [0] to specify the first array value.

//since this is set up as an array that could have multiple values we need to specify the first value in the array with [0]
<p id="title-link"><strong><a href="<?php echo $rss->items[0]['link'];?>><?php echo $rss->items[0]['title'];?></a></strong></p>
<p id="description"> echo $rss->items[0]['description'];</p>

Now that we have the format for our code we can save this file as feeder.php and put it in our includes directory. Next, we include it in our website like this:

include "includes/feeder.php";

Last, we give it a little bit of style:

#weather {
    text-align:center;
    border:1px solid #a29d7c;
    background-color:#d4d2c3;
    width:20em;
    margin:.5em;
    float:right;
}

#weather p{
    font-size:90%;
}

#weather p#description {
    margin-top:0;
    margin-bottom:35px;
    text-align:left;
    padding-left:4px;
}

#weather img {
    margin:4px;
    border:1px solid #a29d7c;
}

#weather .tag {
    clear:both;
    font-size:8pt;
}

I hope you find this useful. Feel free to view the source and use it in your own website.

Get Started generating PDF’s today! Part 3 – extending/reuse

Extending FPDF

If you are new to FPDF you may want to start by reading Part 1: Installation and Part 2: Playing with the options.

We can extend the core FPDF library and set up some functions that we can reuse. For example, we want to present a report in a table. The table will need column headings so that we know what each column of data represents. We could build that into the file for this one report, but say we want another report, different heading names but the same basic structure. We can either replicate the entire file from the other report and change the heading values or we can extend FPDF and create a tableHeader function that accepts an array of heading values and creates the header on the fly. This approach will save us time as we add new reports.

//include the core fpdf library
include 'fpdf/fpdf.php';

//create our custom class
class Myfpdf extends FPDF
{
	//takes an array of values and prints them as text headers with a black border around each one
       function tableHeader($header)
	{
		foreach($header as $col)
		{
			$this-&gt;Cell(38,7,$col,1,0,'L',0);
		}
		$this-&gt;Ln();
	}
}

Now we want to use this to create a pdf. So in our index.php file we need to set up some values and generate the pdf.

//include our custom fpdf class
include 'my.fpdf.php';

//instantiate the class
$myFPDF = new Myfpdf();

//create the pdf
$myFPDF-&gt;AddPage();
$myFPDF-&gt;setTitle('Title');
$myFPDF-&gt;setFont('Arial', 'B', 15);

//set up the Header values and call it
$myFPDF-&gt;tableHeader(array('Header 1', 'Header 2', 'Header 3', 'Header 4'));

echo $myFPDF-&gt;Output('test_header.pdf','I');

There you have it, a reusable table head builder. Now you can use the same concept as above to output the table data.

Get Started generating PDF’s today! Part 2 – playing with the options

If you haven’t read part 1 of the series, you might want to start there.

Options

Today we are going to talk about the options we have when creating a pdf with the FPDF library. We will cover:

  • Changing page orientation and size
  • Changing Font styles
  • Changing the size and style of text cells
  • The different options for saving the final product

Changing page orientation and size

When we initiate the FPDF class we can specify the page orientation, unit of measure and size. Page orientations options are: Landscape (L) and Portrait (P). Next we can set the unit of measure (used for everything except font sizes): Point (pt), Millimeter (mm), Centimeter (cm), and inch (in). To specify page size we have many options along with the ability to specify our own custom size. The options are: A3, A4, A5, Letter, and Legal.

So if we want to create a legal sized PDF in the landscape format, using millimeters as our unit of measure this is what it looks like:

$fpdf = new FPDF('L', 'mm', 'Legal');

Say we want a custom sized page, we need to specify the width and height in an array. The width and height values will use the specified unit of measure. Here is an example:

$fpdf = new FPDF('L', 'mm', array('250','400'));

Our page will be 250 millimeters wide and 400 millimeters high.

Changing font styles

Next we want to set the font and its styles. According to the FPDF website the standard fonts available are: Arial, Times, Courier, Symbol, and ZapfDingbats. We will use Times for this example. Now we can set the font style, the options include: Italic (I), Bold (B), or Regular (empty string). You can also specify a combination of these styles. We will use bold. Last, we want to set the font size (always in points). For this example we will set it at 22 points.

So, our example would look like this:

$fpdf-&gt;SetFont('Times','B',22);

Note: This can be used on a line by line basis to change the font in a pdf.

Changing the size and style of text cells

Now we need to write some text to our pdf. To do this we use the Cell function. There are a lot of options available when writing a text cell: Width, Height, text you want printed, border, where the current position should go after this cell, text alignment, whether the cell should have a background color or not, and a link for the text. For a complete list of the variables see the manual at fpdf.org. We want to output our name in text that is centered on the page, with no border and we want the cell to go to the next line after writing our name.

So, our example would look like this:

$fpdf-&gt;Cell(0,0,'Our Name',0,1,'C');

I have found it handy to have the cell page of the manual open for reference while building my pdfs. It helps me keep the options straight.

The different options for saving the final product

We’ve got our document ready and now we need to save it. We can specify the name for the file (I have found it best to specify a name without spaces such as file_name instead of file name) and the destination of the document. We have four destinations available: Inline (I) to the browser, Download (D) with the browser, Save (F) to a local file, and return the document as a String (S).

So, our example would look like this:

$fpdf-&gt;Output('file_name','D');

Note: I have found “D” to be the most consistent option across the different browsers.

This concludes our lesson for today. I hope this helps you get started playing with the options!

We will be continuing the series soon by extending FPDF to save us time.

Read Part 3 – Extending & Reuse

Get started generating PDF’s today! Part 1 – installation

FPDF

FPDF describes itself as

FPDF is a PHP class which allows to generate PDF files with pure PHP, that is to say without using the PDFlib library. F from FPDF stands for Free: you may use it for any kind of usage and modify it to suit your needs.

Installation

  • Download the library and place it in a directory accessible by your web server

    It generally makes sense to put it in an includes directory.

  • Include it in your web application
/* sample web app */
//include the FPDF library
require_once('includes/fpdf.php');
  • Create the page
//instantiate the object
$fpdf = new FPDF();

//create a page
$fpdf->AddPage();

//set the font, font-style, and size
$fpdf->SetFont('Arial', 'B', 14);

//create the text to be output and go to the next line
$fpdf->Cell(22, 12, "Randy Dustin", 0,1);
//the next line
$fpdf->Cell(22, 12, "Pretty much the coolest person on Earth!");

//create the page
$fpdf->Output();

For more information and tutorials on building pdfs you can go to the FPDF website and reference their tutorials and the manual

We will be continuing this series soon with a closer look at our options when creating a page. Some things to look for are:

  • Changing page orientation and size
  • Changing Font styles
  • Changing the size and style of text cells
  • The different options for saving the final product

Read Part 2 – playing with the options

Timeclock: using FPDF to generate timesheets

Background

Read background information on the design of the timeclock system!

Single vs. Multiple timesheets

Since each student’s timesheet is formatted the same way, whether it is generated as a single timesheet or as part of multiple timesheets, I developed a class to create the timesheets.

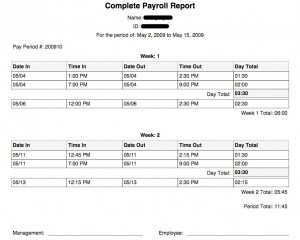
Figure 1: A sample timesheet

In the class is a function called outputPDF which accepts one argument: an array of the timesheet values. Inside the function we begin creating the page.

function outputFPdf($app_data)
{
	$app_data;
	ob_start();
	$output = null;
	$output .= $this->fpdf->SetFont('Arial','B',15);
	$output .= $this->fpdf->Cell(80);
	$output .= $this->fpdf->Cell(30,10,'Complete Payroll Report',0,0,'C');
	$output .= $this->fpdf->Ln(8);
			$output .= $this->fpdf->SetFont('Arial','',10);
	$output .= $this->fpdf->Cell('',10,"Name: ".$app_data['name'],0,0,'C');
	$output .= $this->fpdf->Ln(6);
        &lt;---- edited for brevity ---->
	ob_clean();
	return $output;
}

Now that we’ve got the timesheet ready we’ll create a function that determines the timesheet type.

There are a few things we want to accomplish with this function.

  • Include and instantiate the fpdf library
  • Call the FPDF page numbering function and create the first page
  • Set the page title
  • Check to see if the type is single and if so, generate the timesheet
  • If the type isn’t single check to see if it is multiple and if so, generate the timesheets

So all together it looks like this:

function createPdf($app_data, $type, $begin, $end, $section=null)
{
    // include and instantiate the fpdf library
	include 'includes/fpdf.php';
	$this->fpdf = new fpdfHelper();

    // Call the FPDF page numbering function and create the first page:
	$this->fpdf->AliasNbPages();
	$this->fpdf->AddPage();

    // Set the page title:
	$this->fpdf->setTitle('Complete Payroll Report');

    // check to see if the type is single and if so, generate the timesheet
	if($type == 'single')
	{
		//set the begin period and end period dates
		$app_data['begin_period'] = $begin;
		$app_data['end_period'] = $end;
		//create the timesheet
		$data = $this->outputPdf($app_data);
		//get the current date so we can put it in the file name of the timesheet
		$date = date("m_d_Y");
		//create the file name with the employee's name and the date
		$name = $app_data['name']."_".$date.".pdf";
		//send it to the browser
		echo $this->fpdf->fpdfOutput($name, $destination = 'd');
	}
    // if the type isn't single check to see if it is multiple and if so, generate the timesheets
	elseif($type == 'multiple')
	{
		//get the current date to use in the file name
		$date = date("m_d_Y");
		//do stuff to get all apps in pdf
		$data = null; //create variable to hold the timesheets as we generate them
		//loop through the data and create a timesheet for each employee
		foreach ($app_data as $app)
		{
			//set up begin and end date variables for the pay period
			$app['begin_period'] = $begin;
			$app['end_period'] = $end;
			//generate timesheet for the current employee and store it in the data variable
			$data .= $this->outputPdf($app);
			//create a new page
			$data .= $this->fpdf->AddPage();
		}
		//create the file name and include the name of the department (section) in it
		$name = "payroll_report_".$section."_".$date.".pdf";
		//send it to the browser
		echo $this->fpdf->fpdfOutput($name, $destination = 'd');
	}